3.30.2013

::Happy Birthday to Me and Happy Easter to You::


Every now and then, the stars align and my birthday falls on Easter.
I get double prizes then.


Me at three, circa 1970. 
Anyone else remember that thick fluffy yarn our mamas tied into our piggy tails?


I've spent the evening filling baskets with chocolate bunnies and jelly beans for all my favorite kiddies, 
from age 28 down to 11 months.
Grandbaby Robyn Rose is getting this hoppity wee rabbit instead of the chocolate variety.


Me at 1 week or so spring 1967, with my dad and his smoke.  
Days of Mad Men, and all.


Hope your day is filled with yummy-ness and ham.  
Or whatever lovely things say "Spring is Here!" in your cottages.
Wind-up bunnies do it for me.

3.24.2013

::Stylin' Those Shelves...A How To::

PSSSST...I'm no longer blogging here!
You can now find me at

-----------------------------------------------------------------


Hey cottage friends!
I'm excited to show you how I go about styling my shelves. 


I change them out with the seasons, so it's a skill I've honed over the years.
I also like quite a bit of 'movement' in my vignettes, but even if you don't, I think my tips can still serve ya.


There is actually a method to my madness, but I'm no professional, nor do I play one on TV.
Most of what I've learned came thru studying pages of magazines and catalogues.  


So are ya ready?  Here are my tried and true tips on making mini vignettes on your shelves, your mantels, your piano tops....you name it!

TIP #1:  Move it to the center.


You'll notice I mentioned 'when you can'....because on my middle shelf, I can't.  Which leads me to...

TIP #2:  Consider the practical stuff.


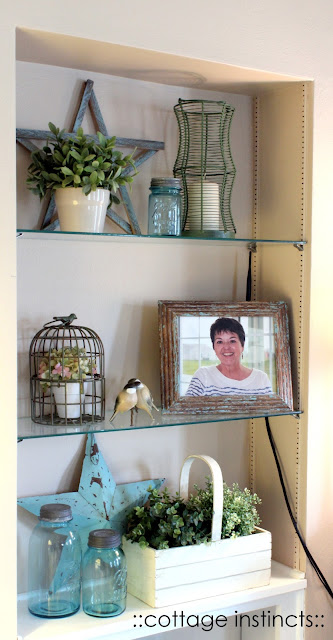
My beautiful Mama's picture helps to hide the technology that doesn't exactly fit into my ::cottage instincts::
So I can't squish everything to the center on that shelf.  

TIP #3:  Use variations on a theme.


There can be several themes so long as they play nicely together, coordinating by color, shape, type, etc.
 I like to mix up textures and finishes too.
This is where you get a big payoff if you've learned what you love (and not just 'like'), because you'll realize you tend to buy things that go with your 'themes'.  Surface styling is also a fantabulous way to add in a few of your 'likes' or trendy stuff as these vignettes lend themselves to changing often.

TIP #4: Pay attention to the size of the space and your items.


Vary the height and width of stuff.  Size the items in the space in proportion to the space they will occupy.
I used my tall metal candle holder and barn star to fill the space here, especially since it's the top shelf.

TIP #5: Group items in odd numbers....
OR group an odd number of groups!


You'll notice there are 2 groups of only 4 items...which breaks the rule of odds.  BUT  it all works because there are 3 shelves.  And adding all the items together make 11, another odd-y but good-y.

Here I will let you see the nifty wallpaper border the previous owners left for our enjoyment.
And some more examples of themes:


Another view....


Here's a test.  I mean that's why you come here, right?  To be tested?
I posted this pic yesterday when showing you how I Spring-ified my dining room.  
Can you see how I used all my tips?


TIP #6:  When you find yourself frustrated and/or overwhelmed do these three things:
~Stand back from the space and squint your eyes.  Do it.  It migt help you see what's needed or what's not working.
~Take some pictures and look at them on the computer...amazing what jumps out at you.  
~Go eat something that makes you happy (ahem *Little Debbie Oatmeal Cream Pies* cough) and come back later.


Here's where I show you what the built-in looks like for reals.  The cabinet below houses Robyn Rose's toys.  I'll be hanging a curtain there soon, as well as adding beadboard wallpaper in the back, adding trimwork along the outside, replacing the glass shelves for wood, and painting it all white.  


So what tips do you have for styling shelves and horizontal spaces?
Do any of mine help ya at all?


Transformation Thursday @ The Shabby Creek Cottage
http://www.frommyfrontporchtoyours.com/2013/03/treasure-hunt-thursday-100.html
The Farmhouse Porch's the Scoop
Tweak It Tuesday @ cozy little house
:
Home Stories A2Z
{Primp}

3.23.2013

::Spring-ifying our Temporary Home::

Despite a ridiculously cold, snowy and windy March,
and even amidst some pretty classy maroon faux painting left from 
the previous owners, 
I finally dug into my spring decor boxes for a session of....


Today I'll show you the dining room....which is the only dining area in the home, and measures 9 X 9.
Yep.


My wee hutch barely fits, but I was determined to have it in there.
It's a fun space to decorate for the seasons, and we have no mantel here.

Lovin' these pastel mercury glass egg ornaments I picked up last year at Pottery Barn.


You know me....I have absolutely no issue using fake nests and fake eggs.  


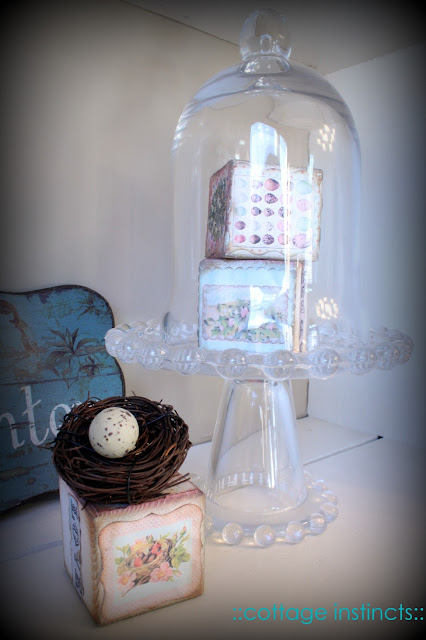
I thought a cloche-within-a-cloche was a kinda cool idea....


My seasonal blocks and a wee nest...


This is actually a real next with fake eggs...with real eggs in the back.


This is a tiny niche in the wall...the house was built in 1952, so there's several of these around the place.


This one is actually a peek thru.  There's an old phone box below it.
If you scroll back up you can see both in the picture of the entire room.


Here's a bit of springy stuff in our bathroom.


We're slowly getting settled in here, even thought it's temporary.  
I will be sharing some ways we'll make it 'ours' for the short time we're here.  

We'll also be doing some room transformations since it will be my daughter's house after we move...
she's anxious to rid the house of it's 90's contemporary flair. :)
Thank goodness her style is very similar to mine!


 Next up I'll share some ways I've staged some built-in shelves in the family room.


3.20.2013

::Goodbye Old Kitchen, Hello Someday Kitchen::

PSSSST...I'm no longer blogging here!
You can now find me at

-----------------------------------------------------------------

Let's talk about kitchens, shall we?

Today I want to show you my old kitchen in my previous house.
I never did a post about my kitchen because it was just weird. 
Functional, but weird. 
It had mismatched, old appliances, crappy laminate counters, nasty vinyl floor, orange oak cabinets
.....well you get the picture.
Actually you get this picture...taken the day of our inspection in 2008.


Here's another beautyshot from that day:


I was working with a limited budget and overwhelmed with the amount of wallpaper and brown we were dealing with throughout the home, so I just used the magic of paint mostly.  Oak cabs turned white, hardware replaced with black, walls became blue....


Then brown.....here's the shot from our realtor's camera in January, taken for the listing.
And how 'bout that oak ceiling light box, eh?  Fabulous.  


What this doesn't show is the beast of a stainless fridge we got secondhand from a friend remodeling her kitchen as ours was 25+ years old and falling apart....and I loathe stainless steel, btw.  Hated it from the moment it started popping up in my country/cottage mags 15 years ago.  To me it's cold and sterile and the opposite of what I'm trying to achieve in my cottage look.  

But hey, it carried the mismatched vibe I had going on in there already....stainless fridge, bisque oven/fan, black dishwasher, white sink. *rolling eyes*.  I like eclectic, don't get me wrong, but really?


I did love how my valance fabric looked with my walls....

 Anyway, in case you missed it, we're hoping to build a house next door to the small home we just bought.


So now I'm plotting and planning my next kitchen.....and because I'm drawn to so many different cottage looks, it's been quite an exercise in frustration.
Still trying to differentiate between my likes and loves.
 Here's the builder's take on 'modern cottage' with our floor plan (this was their offering for last year's 'parade of homes')


Terrible picture...it blurs when I try to enlarge it. Here's a link to the page where you can see better shots of the interior of the home.
Anyway, not my style.

So what am I shooting for?

Well, if you've been watching my 'Yummy Kitchens' Pinterest board blow up, recently, you'll see ideas and looks I'm trying on for size.

You'll see lots of blue cabs and white appliances with warm wood floors.


This is my mama's kitchen, Christmas 2011.
Missing her so much on this new decorating adventure (she's been gone 6 month now....)

Then I see beautiful white cabs with pale blue walls and go *sigh*...
I've shown this kitchen previously, but I just adore the beachy hues (but not the stainless fridge, lol)


This awesome space comes very close to vibe I love....


Seriously considering glass front upper cabs with blue backs like this:


But I adore open shelving too, especially if beaded board arrives on the scene, like these:
(Chris' kitchen is AMAZING.)


Other ideas I'm kicking around:
Mixing finishes/colors...


love the warm wood touches....

This kitchen has so much of what I love...white uppers with blue backs, blue lowers, wood island (and beadboard, planked ceiling, mixed counter surfaces....not sure how I feel about the subway tile, and I definitely don't like the lighting.)


Other touches that caught my fancy (like or love?  Still trying to decide!)
Interesting trim detailing under cabs, awesome aqua ripple glass and fabulous knobs.
I even kind like the baby subway tile....hmmmm.


farmhouse sink....
(no link from pinterest?)

I know this isn't kitchen cabs, but I love the color Diane used on this hutch/dresser and I'm seriously thinking of going with brass hardware on my lower cabinets.  Diane dulled the shine a bit...I actually like both the shiney and antiqued versions of brass...but not plain shiney gold a la 1980's.

And how 'bout an antiqued brass pendant light?

with a vintage-look antique brass faucet?

Then again I love oil-rubbed bronze too....and we'll prolly use that on all the doors around the house.

I took this elcrapo pic with my phone from Country Living's 500 Kitchen Ideas book last night at B&N:


I think this comes very close to what I'll do....it combines many of the elements I mentioned in this post:

White glass-fronted upper cabinets with colored glass knobs and corbels beneath (perhaps paint the interior backs with my pale blue wall paint color)
White Beaded board.
Painted lower cabs and island (I'd do some darker version of my pale blue wall paint with brass bin pulls)
Butcher block counters (may just do this on the island), and I'm digging that warm wood corbel on the overhang....
I also like the Shaker style cabs and white appliance(s)
Donuts.

Did you notice how I took a ton of images and began pulling the common denominators out to define my style?  Then when I saw the above image, I recognized 'the look' immediately, even though my kitchen will still reflect ME.  I actually spent several evenings deleting many kitchen pins from my board, so I could really focus in on stuff that I know I can commit to long term....my loves.  

And of course, many of these elements will be grafted in to our builder-grade kitchen over time as we can't afford to do everything at once, even though it's tempting to mortgage the cost of that antique brass faucet up there....

Thanks for walking down the long, windy path toward my dream kitchen....I'll keep ya posted as we wait on word from the lender on whether they'll even finance this undertaking next door.


I'm curious...do you go thru and delete pins now and again as your preferences change or become more congealed?  I'm working on cleaning up my inspiration files both on Pinterest and on my decorating books/mags shelf.  It's a great way to walk thru that sorting and sifting exercise, that honing of your personal ::cottage instincts::


LinkWithin

Related Posts with Thumbnails