Pages

8.31.2010

Guest Post: Gail schools us on the tools of DIY trade.

I have been sooooo wanting to learn how to work with wood, crafting it into coolio shelves and tables and stuff that I can then slather on coats of creamy blue-grey paint.  Not knowing where to start, I had the brilliant idea to ask Gail of My Repurposed Life to take me to school.  She's been generous enough to work up a post to share here.  Everyone welcome Gail to cottage instincts!

100_3113 Hi, I’m gail from MyRepurposedLife.net,
 repurposedLife_150static
this is my alter-ego

I want to thank Cindy for inviting me over to talk to you about tools.  I don’t have all the tools a girl could want, but I am fortunate enough to have a generous family that understands that I would rather have something from Home Depot than a new scarf from Target.


100_6197
This tool box was a gift from my nephew Bubba. I work out of a tool box rather than tools hanging on a pegboard. Would I like to have a pegboard full of tools?  Sure!  But it’s expensive to have one of everything, let alone TWO of each tool.

100_6199

100_6201

100_6204


100_6206
I wasn’t the best student in math class, so I prefer a tape measure that has easy to read fractions.

100_6221
A speed square is so handy.  I use it all the time to make sure things are square, to measure the space of an “overhang”, and of course to draw a straight line.

100_2203
It’s great to have more than one cordless drill.  When my friend Cathy and I build benches, we keep three drills handy. The one on the left is used to drill a pilot hole through the thick parts of a headboard. The drill in the middle is used to drill a countersink hole. (so the screw heads can be sunk and filled in) The drill on the right is used to screw the screws in.  I would recommend a Dewalt cordless drill. Cathy and I both have a 14 volt Dewalt.  It is a workhorse!  My firestorm cordless drill is great in the fact that it has that quick change part. It snaps right off to reveal a screw bit.


100_6232
One of the power tools I use the most is my battery operated 18 gauge nail gun. (finish nails, not building nails)  This model has been discontinued. Someday I will be lucky enough to have a air compressor and a nail gun that shoots “building” nails.

100_9602
Every DIY person or weekend warrior needs a good sander. I have a palm sander (the square kind) and this orbital sander.  The orbital is my sander of choice. My daughter recently called me to ask my advice about sanders, and I recommended this one for her. The pad spins around and changes rotations, which gives you a great smooth finish without any worry about going with the grain.  My sander’s best friend is my leaf blower. After a good sanding, every piece gets blown off with the leaf blower, then wiped down with a slightly damp paper towel.  Yeah, I know, I’m supposed to use a tack cloth, but I don’t have one.  The leaf blower is also great to blow the sawdust off of my saws before I store them in the garage.

 100_6037
This is my first compound miter saw. It’s a small one. It did everything I needed it to do for a couple of years, but then I outgrew it.

100_6034
I got this saw last year for Christmas. It will cut up to a 1x8.  It bevels only to the left. It is not a dual bevel saw.  I didn’t even know they had such a thing until I was watching HGTV a couple of weeks ago.  If you have an unlimited budget, I would recommend a Sliding Compound Miter saw.  It will accommodate  a very wide board.

100_5593
I got this reproduction radio cabinet a couple of years ago. It is the perfect height to hold my saw. Look, it even has storage! 

100_6035
I used a scrap piece of plywood on the bottom of the cabinet so I could add wheels.  I always move my saws out of the garage while using them, so the wheels make it much easier to maneuver this saw.


100_5595
I have secured it to the top of the cabinet with screws.


100_6031
This table saw was my first saw.  I think it’s a tossup as to which kind of saw should be your first saw.  I actually use my miter saw a LOT more than I do my table saw.  Remember that Home Depot and Lowes will make your “rip” cuts for you.  (a rip cut is a cut made parallel to the wood grain).  You will see on a lot of home improvement shows use table saws without the “guard” installed.  I don’t want to scare you but using a table saw without the guard in my opinion is very dangerous. Some blade guards have anti-kickback devices that allow only forward travel past the blade. There are a lot of helpful videos on YouTube, such as this one that shows a kickback.


 100_8663
I have also put wheels on my table saw. I used scrap pieces of plywood.  Notice I didn’t have to use a large square piece, but two rectangular pieces.


100_6033Because of the “nature of the beast” I used LOCKING wheels.  Your table saw should be level and unmovable while in use.  Safety first!


    100_6056
The last saw I’m going to talk about today is this handy jig saw. You can use a jig saw to do many regular jobs, such as ripping a small piece of plywood, or making a “cross cut” on a 1x or a 2x4.  I don’t make too many detailed cuts, but when I do it’s handy to have this saw.

I hope you’ve learned a little through this post. If you’re interested in learning more about what I do, stop by MyRepurposedLife.net.

Thanks Cindy for having me over today!  I love your blog.
gail

Thank *you* Gail!  Wow!  I feel like I won't look like such a dolt when I go wandering thru the powertools in Lowes now.  And it's always so much better to hear from a regular gal who's using her tools and not working for the company or trying to sell a book.  So....guess what I'll be asking Santa for this year?  A hundred pound box of Little Debbie Oatmeal Cakes and some power tools, of course. 

Do you use these DIY tools?  What have you made with them?  If you're a woodworking woman, show me what you've made....leave a link in your comments so I can come see!  And for T.O.N.S. of inspiration, definitely go see Gail at My Repurposed Life.  She makes amazing stuff! 

8.30.2010

Where I Blog.

Which should be titled 'Where I Live', since I spend hours here between blogging and schooling kids.

So if you're interested in what the rest of our schoolroom looks like, you can visit that post on my homeschooling blog HERE.

Just linkin' up with Centsational Girl's party....'cause we all need to put a desktop with a name, eh?

8.29.2010

Make it 4 Monday!

I cannot believe how fast Sunday evening rolls around.  I was just out lollygagging in the pool when I remembered I needed to get this post ready.  Looking forward to seeing what 'cha got this week!

Here's the rules.  Gotta have rules.  Well, you don't gotta, but it helps keep me sane.  Here ya go...

Pretty please with Little Debbie Oatmeal Cakes on top, only link:
DECORATING PROJECTS 
FOR THE HOME
That means no recipes, no clothes, and no crafts unless it will be used 
FOR MAKING YOUR (or someone else's) COTTAGE LOOK OR FUNCTION BETTER.  
If you're not sure, email me. 
Yes, I will delete posts that don't color within the lines.  Yes, I deleted links every week.  Makes me feel like a meanie, but alas, I will do it again this week if need be.
And here are my Top 10 picks from last week's party. Drumroll Please:

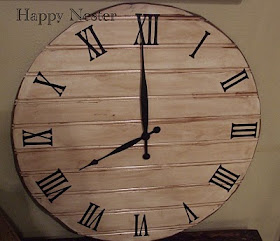
Monica the Happy Nester made this wicked cool beadboard clock:

Sharon at Elizabeth and Co. made some galvanized goodness right here:

The Painted Hive shows us how it's done with new knobs:

Girl in Air shows off her little guy's amazing room:

Inside the Yellow House created this airy master suite:

Inspired by you inspired me with her creative desk makover:

Twice Lovely totally rocked it with this armoire do-over:

Impatiently Praying for Patience must've got some because her coffee table turned out fabulous:

My Cottage Charm completely charmed me with her son's room re-do, including DIY built-ins. Amazing:

Lastly, Songbird set up a be.U.tiful vignette with some dandy flea market finds:

So if I picked ya, pick ya a button if you'd like:

cottage instincts


8.28.2010

Weekend Welcomes 4th Edition...and Questions Answered

Hola!  More followers to introduce to y'all.  Can I just say how amazed I am that I get new folks reading my blatherings each week?  Seriously, I'm like stunned.  But there they are....bright shining faces letting me know they're stopping by now and again....I won't tell you about the 2 who un-followed.  BTW, that's me in the red up there.  Not sure where my ears are or why my left arm is 3 times the size of my right arm.  Any ideas?

So anyway,


to my little spot on the web.  If you're listed below and have a blog I missed, please click that kooky woman in the birdcage in my sidebar, and I'll get you set up right quick.  Everyone go welcome these nifty folks!

Ellen at Abounding Life
Laura at White Spray Paint
Tingle Lane Primitives
Alayna
Hilary at sweet as june
Lori Lynn's Cottage
Graphic Design by Tara
The Paper Princess at Create With Joy
Cathy at The Far Fifty
Stage My Home
May Flower Mama
Linda
Cindy at Purple Froggie Clay Stuff
Angie at Living Aloha
Love of All Things Vintage
Kari
Liz at Bizzy Dayz
Dreamingof03
Anneliese at Sew Blessed
Molly at White Trash and colorful accessories
Heather at Vintage Girl
And the few anonymous new followers and subscribers, y'all are welcome too :)

Just a few questions this week.


Anne at Fiona and Twig asked:
I'd like an explanation as to how you got in my garage to snap that photo, hmmm?
Me:  Um, I just kinda walked right in.  And I'll be stalking your new place too.  

Debbi Thinks Deep wondered:
Remember the old song? ". . . makes my hear go Pitty Pat, Do Li Do . . ."
Me:  If I do I'm not letting on.  But glad to know my re-dos bring a song to your heart :)


May Flower Mama asked:
Do you sand or prime the furniture before you paint or do you go right to the fun color?
Me:  I didn't sand or prime the bookshelves...just wiped them down with some Liquid Sander.  I'll be doing a post soon on how I paint stuff and what I use.  It all depends on the finish I'm after, the condition of the piece and what kind of mood I'm in. :) 

Well, that's it.  Be welcomed and have an Oatmeal Cake.  And hook up your home dec projects tomorrow at Make it 4 Monday 'round about 6pm my time....that'd be Indiana-time.  The east side.

8.27.2010

In Which the Boy Learns to Wield a Spray Paint Can.

You may remember this:

Well, today he decided his masterpiece needed some paint.  He described what he wanted, a mish-mash of colors to match his backugan guys.  But he didn't want it to look like a 'blob' of color.  More like "what a little kid would paint".  Um, yeah.  So we picked out some spray paint colors, I tied up the control monster, and let him have at it.

After I spray-primed and did some sanding,  I showed him how to use a can of magic....otherwise known as SPRAY PAINT.  He did some practice shots on the back, then went to town on the front:

But quickly decided it was getting in his eyes and mouth....so I was a good mom and relented.  I gave him some protective gear.  *sheesh* Kids these days.


He started with some blue, then laid on some green:


"Hmmmm," says he.  "I think I'm ready for some red now, Mom."


"So I shake it up like this?"

"Even more?  Can I be done shaking now?  This is taking a thousand hours....."  BTW, you don't see the spray painted grass.  I never spray paint grass.  Never.  Nope.


Is that lookin' cool or what?


After a few more colors, he considers it done.  I told him to stand back and take a look:

He likes it!  And he's darn proud of himself.  I'm proud of him too!


He asked me to use silver paint around the edges and stencil in red "BACKUGAN" on top, so we're off to the store for some more paint.  I'll show you the finished project when it's done.  I may even spell Backugan correctly.  Perhaps.

PS.  My boy just came in, took a look over my shoulder as I was typing this post up and said, "I knew it!  You had that camera out there just so you could put me on your blog!"  But methinks he dost protest too much.  He loves the attention.  Just like his mama.